Example: A Visual Studio Extension Command Targeting a Solution Explorer Project
This is a post to explain how to write a simple Visual Studio extension for a menu command that targets a project in the Solution Explorer . The idea being that you right click a project in Solution Explorer and you get a menu item.
This example was written in Microsoft Visual Studio Community 2022, Version 17.13.3. the code for this example can be found in this repository on GitHub. It assumes that you have the Visual Studio SDK installed.
Instructions
Step 1. Create the VSIX Project
- From the *File menu choose *New Project
- From the list of project types pick *VSIX Project
- Choose a suitable name, for the sake of this example the project will be called ProjectCommandDemo and click *Create to create the basic project.
You should now have a simple project with a file ProjectCommandDemoPackage.cs that represents the project pacakage.
Step 2: Add the Menu Command
- Right click on the ProjectCommandDemo project and click *Add > New Item
- From the *Extensibility section choose the *Command option.
- Choose a suitable name, for purposes of this demo we will choose ProjectCommand
This will create the ProjectCommand.cs file representing the project, but also the ProjectCommandDemoPackage.vsct file that contains the XML that defines how any features implemented in the command will appear in the Visual Studio UI. In this file we need to make a few edits.
First, in the seection of ProjectCommandDemoPackage.vsct we need to make a change to the *Groups node within the *Commands tag so that our command is placed on the project menu, to do this we need to change the id on the *Parent tag from IDM_VS_MENU_TOOLS to IDM_VS_CTXT_PROJNODE:
<Groups>
  <Group guid="guidProjectCommandDemoPackageCmdSet" id="MyMenuGroup" priority="0x0600">
    <Parent guid="guidSHLMainMenu" id="IDM_VS_CTXT_PROJNODE"/>
  </Group>
</Groups>
We then need to make changes to the *Buttons section so that we can choose a suitable label for our new created menu item. The new *Buttons section should look something like this:
<Buttons>
<Button guid="guidProjectCommandDemoPackageCmdSet" id="ProjectCommandId" priority="0x0100" type="Button">
<Parent guid="guidProjectCommandDemoPackageCmdSet" id="MyMenuGroup" />
<Icon guid="guidImages" id="bmpPic1" />
<Strings>
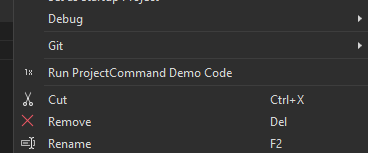
<ButtonText>Run ProjectCommand Demo Code</ButtonText>
</Strings>
</Button>
</Buttons>
Make sure that the *Button guid name matches the guid specified in the earlier *Group tag.
At this point it should be possible to see out newly created menu item in action. We can run our extension code in the Experimental Visual Studio Instance the same way we would run and debug any other application, running the project will start a new Experimental Instance of Visual Studio. If you open a project in this instance and right click that project in *Solution Explorer you should see the new menu item. Clicking it should show the test message contained in the *Execute function of ProjectCommand.cs.
Step 3: Determine the Clicked on Project
The final step involves using to the Visual Studio DTE service to determine the currently selected project to do this we need to make some changes to ProjectCommand.cs the first is that we need an instance of System.IServiceProvider to obtain our DTE service, to do this I recommend removing the original ServiceProvider property and replacing it with the code below:
/// <summary>
/// Gets the service provider from the owner package.
/// </summary>
private System.IServiceProvider ServiceProvider
{
    get
    {
        return this.package;
    }
}
With our new ServiceProvider we then need to get the DTE service which we can query for information relating to the currently selected project in the UI. Replace the Execute method in ProjectCommand.cs with the code below.
private void Execute(object sender, EventArgs e)
{
    ThreadHelper.ThrowIfNotOnUIThread();
    EnvDTE.DTE service = (EnvDTE.DTE)ServiceProvider.GetService(typeof(EnvDTE.DTE));
    var selectedItems = service.SelectedItems;
    EnvDTE.SelectedItem projectItem = null;

    foreach (EnvDTE.SelectedItem item in selectedItems)
    {
        projectItem = item;
        continue;
    }

    if (projectItem == null || projectItem.Project == null)
        return;

    var project = projectItem.Project;
    var title = "ProjectCommand";
    var message = $"Command run against project: {project.FileName}";

    VsShellUtilities.ShowMessageBox(
        this.package,
        message,
        title,
        OLEMSGICON.OLEMSGICON_INFO,
        OLEMSGBUTTON.OLEMSGBUTTON_OK,
        OLEMSGDEFBUTTON.OLEMSGDEFBUTTON_FIRST);
}
This example simply outputs the file location of the selected project in a message on to the user's screen, but it forms a good basis for command that performs some kind of operation against a specific Visual Studio Project.
A Note of Thanks
I'm indebted to Jeremy, who asked this question it's a question about a different Visual Studio tool window but their initial code gave me something to work with.
Published on 21:02:58 23 Mar 2025